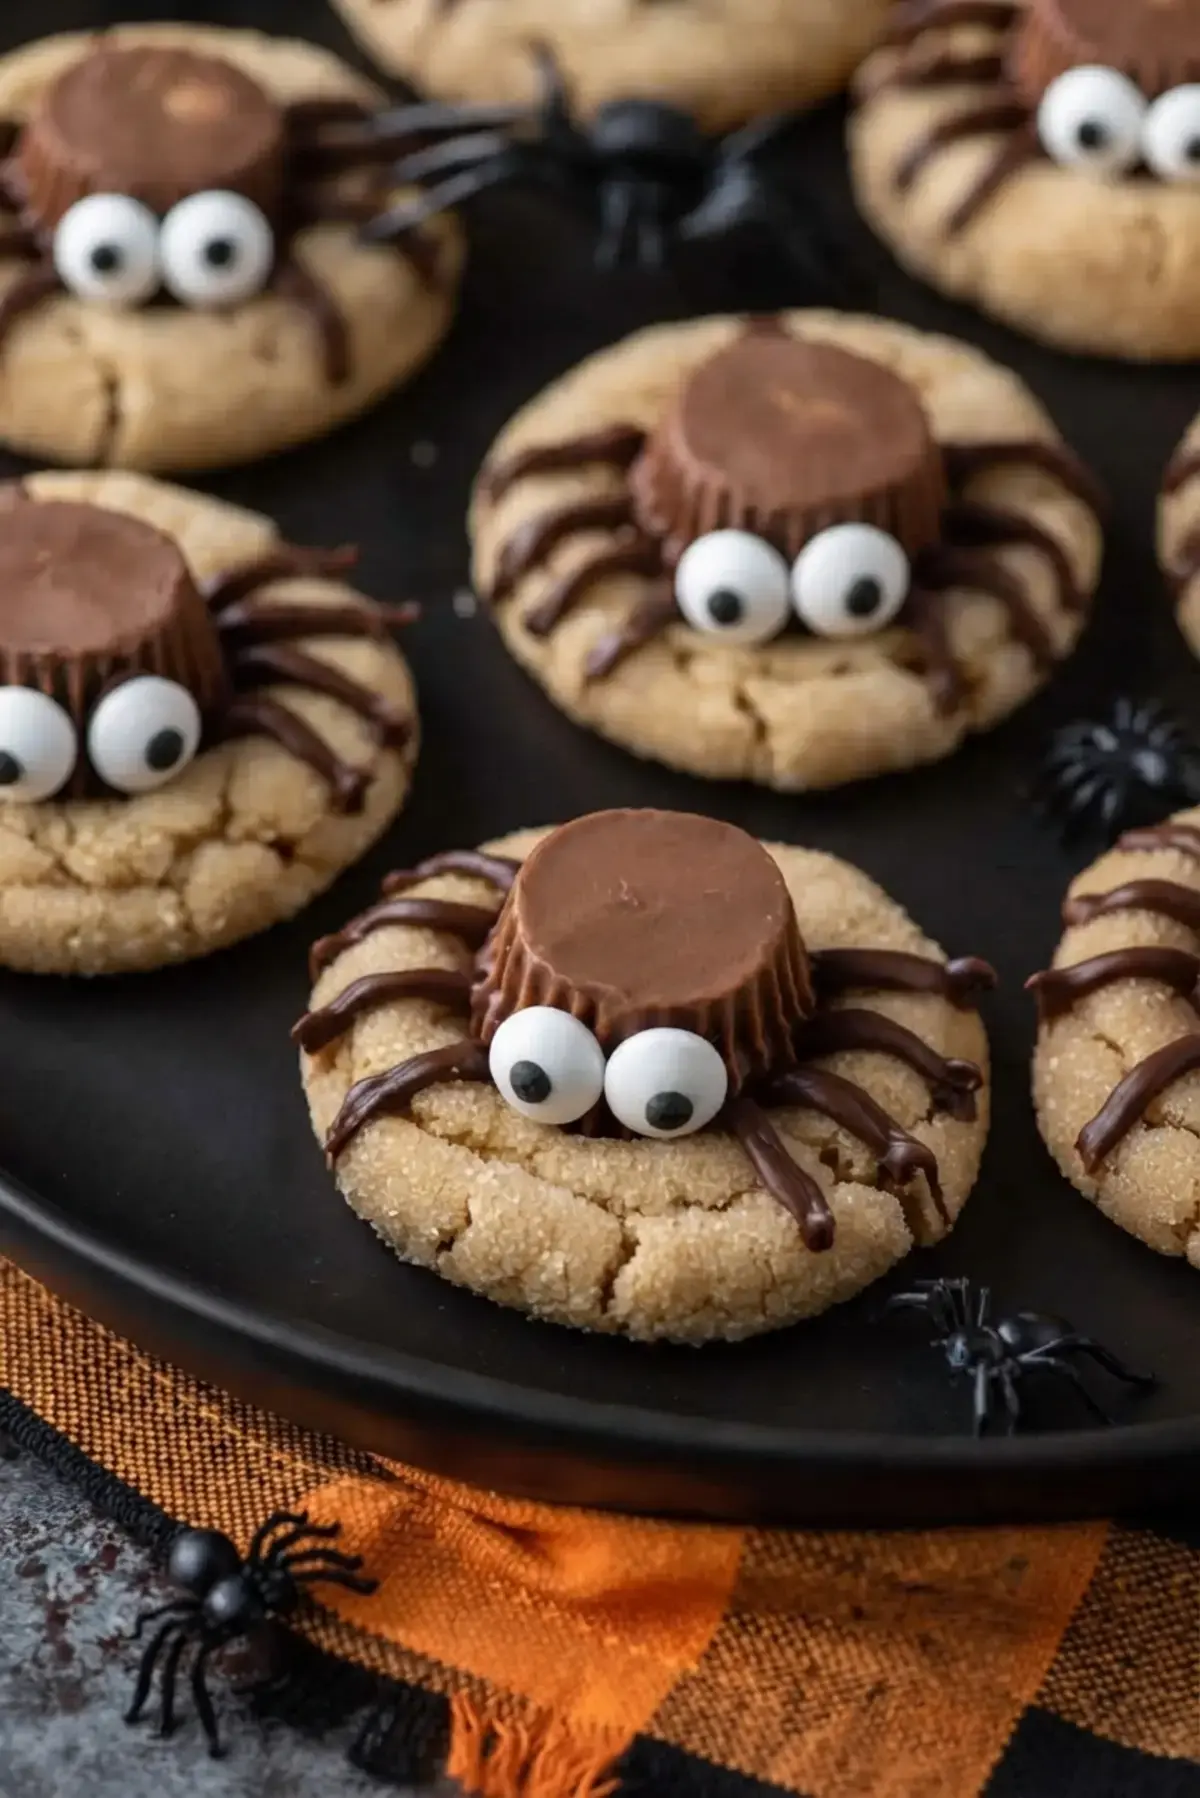
These Halloween treats are soft, chewy peanut butter cookies with a mini Reese’s peanut butter cup pressed into the center, then dressed up with melted chocolate legs and candy eyeballs. If you have ever made peanut butter blossoms, the idea will feel familiar.
This version swaps the classic Hershey’s kiss for a mini Reese’s cup and adds a few quick chocolate details that turn an everyday cookie into a little spider.
The dough comes together in one bowl with an electric mixer, needs no chilling, and bakes in about 11 minutes. From start to finish the whole project runs roughly 26 minutes, which makes it a realistic option for a classroom party, a Halloween potluck, or a weekend afternoon with kids who want to help decorate.
The decorating stage is the fun part. Melted chocolate goes into a squeeze bottle, four legs get piped on each side of the peanut butter cup, and two candy eyes finish the face. It is simple enough for beginners, and it is forgiving, because a slightly wobbly leg still reads as a spider.
This adaptation follows the peanut butter spider cookies recipe from The First Year blog, with the same soft cookie base and the same chocolate finishing touches.
Why You’ll Love These Halloween Cookies
Halloween desserts usually fall into two camps: impressive but fussy, or quick but plain. These land in the sweet spot.
Peanut Butter Spider Cookies For A Spooky Halloween Treat 27
They are fast. Prep takes about 15 minutes, the bake takes about 11 minutes, and the dough never needs to rest in the refrigerator.
Most of the shopping is already done. Butter, sugars, peanut butter, egg, vanilla, flour, baking soda, baking powder, and salt are pantry staples for most home bakers. You really only need to pick up mini Reese’s cups, semisweet chocolate chips, and candy eyeballs.
The flavor pairing works. Creamy peanut butter and chocolate is a classic combination, and the brown sugar in the dough adds a soft molasses note that keeps the cookie from tasting flat.
They look like a party. The little chocolate legs and candy eyes make them a natural centerpiece on a Halloween dessert table or a spooky charcuterie board.
They are kid friendly. Piping legs and placing eyes is a job most children can handle with a little supervision.
One batch makes 24 cookies, so there is enough to send a few home with guests.
The full list comes to 15 items, and the measurements below match the original recipe card.
Ingredient
Amount
Note
Unsalted butter
1/2 cup (1 stick)
Room temperature, but not overly soft
Brown sugar
1/2 cup
Adds a light molasses flavor
Granulated sugar
1/3 cup
For the dough
Creamy peanut butter
3/4 cup
Not natural style
Large egg
1
Vanilla extract
1 tsp
All purpose flour
1 1/2 cups
Baking soda
1 tsp
Works with the baking powder for lift
Baking powder
1/2 tsp
Salt
1/2 tsp
Granulated sugar
As needed
For rolling the dough balls
Mini Reese’s peanut butter cups
About 24
One per cookie
Semisweet chocolate chips
1/2 cup
For melting and piping
Neutral oil
1/2 tsp
Optional, to thin the melted chocolate
Candy eyeballs
As needed
Two per cookie
A few notes on the ingredients. Use creamy peanut butter rather than a natural style, because natural peanut butter separates and can change how the dough holds together. The butter should be at cool room temperature, soft enough to beat but not greasy.
Both baking soda and baking powder go into the dough, and together they give the cookies their gentle rise and slightly cracked tops.
Candy eyeballs are usually sold at craft stores and often turn up in grocery stores during the Halloween season, so it is worth checking both. If you can only find one size, the small ones sit nicely on a mini peanut butter cup.
For reference, the source nutrition works out to about 163 calories per cookie, with 17 g carbohydrates, 10 g fat, 3 g protein, 4 g saturated fat, 1 g fiber, 9 g sugar, 142 mg sodium, and 17 mg cholesterol. Those numbers are approximate and shift with ingredient swaps.
How to Make Peanut Butter Spider Cookies
The method is straightforward. Make a soft peanut butter cookie dough, bake it, press a frozen peanut butter cup into each warm cookie, then pipe on the chocolate legs and add the eyes. Total time is about 26 minutes, with 15 minutes of prep and roughly 11 minutes in the oven.
Peanut Butter Spider Cookies For A Spooky Halloween Treat 28
Freeze the peanut butter cups and preheat the oven. Unwrap about 24 mini Reese’s cups, put them in a bowl, and place the bowl in the freezer. Chilled cups hold their shape better once they hit a hot cookie. Preheat the oven to 350 degrees Fahrenheit.
Beat the butter and sugars. In a mixing bowl, combine 1/2 cup room temperature unsalted butter, 1/2 cup brown sugar, and 1/3 cup granulated sugar. Beat with an electric mixer for 1 minute, until the mixture looks smooth and fluffy.
Add the wet ingredients. Beat in 3/4 cup creamy peanut butter, 1 large egg, and 1 tsp vanilla extract. This takes less than a minute.
Mix in the dry ingredients. Add 1 1/2 cups all purpose flour, 1 tsp baking soda, 1/2 tsp baking powder, and 1/2 tsp salt. Mix on low speed or fold with a spatula just until everything comes together. Stop as soon as the flour disappears, because overmixing makes the cookies tough.
Shape and bake. Use a small cookie scoop or a tablespoon to portion the dough. Roll each portion between your hands into a uniform ball, then roll it in granulated sugar. Arrange the balls 2 to 3 inches apart on a silicone lined baking sheet and bake for 8 to 11 minutes, until the edges begin to crack and turn golden.
Add the peanut butter cups. As soon as the cookies come out of the oven, press one frozen mini Reese’s cup into the center of each one. Let the cookies cool on the baking sheet for 15 to 20 minutes before moving them to a cooling rack. Moving them while they are still warm can make the cup sink and lose its shape.
Melt the chocolate and pipe the legs. Put 1/2 cup semisweet chocolate chips in a microwave safe bowl, along with 1/2 tsp neutral oil if you want a thinner consistency. Microwave for 3 minutes at 50 percent power, stirring after each minute, and continue until fully melted. Transfer the chocolate to a squeeze bottle or a sandwich bag with the corner snipped off, then pipe 4 legs on each side of every cookie.
Attach the eyes and let them set. Dab a little melted chocolate on the back of each candy eyeball and press two onto the peanut butter cup. Let the chocolate set completely before moving the cookies to a serving platter.
If you want the same steps in a printable format, the Peanut Butter Spider Cookies page on this site has the full card.
Peanut Butter Spider Cookies For A Spooky Halloween Treat 29
Tips for Success
Small details make the difference between a cute spider and a puddle of chocolate.
Peanut Butter Spider Cookies For A Spooky Halloween Treat 30Peanut Butter Spider Cookies For A Spooky Halloween Treat 31
Keep the dough balls the same size. Whether you use a cookie scoop, a tablespoon, or a kitchen scale, even portions bake at the same rate. Uneven balls mean some cookies are raw in the middle while others are overdone.
Freeze the peanut butter cups ahead. A cold cup slides into a hot cookie without melting on contact, so it keeps its shape and stays put.
Do not overmix the dough. Mix the flour in just until combined, then stop. Extra mixing develops gluten and produces a tougher cookie.
Pull the cookies at the right moment. Look for set edges that are starting to crack and turn golden. Erring on the side of slightly underdone is fine, because the cookies keep baking on the hot sheet after they leave the oven.
Respect the cooling time. Fifteen to 20 minutes on the baking sheet is not optional. Move them too soon and the peanut butter cup sinks into the soft cookie and the shape is lost.
Add the eyes while the chocolate is still warm. Melted chocolate is the glue. Once it hardens, the eyes will not stick.
Let the chocolate set before serving. If you move or stack the cookies too early, the legs smear.
Frozen peanut butter cups hold their shape better in a hot cookie, so unwrap them and get them into the freezer before you start mixing the dough.
Peanut Butter Spider Cookies For A Spooky Halloween Treat 32
How to Store
Keep the decorated cookies in an airtight container at room temperature, and they will stay good for up to 3 days.
Peanut Butter Spider Cookies For A Spooky Halloween Treat 33
If you need to stack them, place a sheet of parchment paper between the layers. The chocolate legs soften slightly over time, and parchment keeps them from sticking to the cookie above.
Can I Freeze These Cookies?
Yes, and you have two options.
Peanut Butter Spider Cookies For A Spooky Halloween Treat 34
Freeze the dough. Shape the dough into balls, but skip the granulated sugar coating. Flash freeze the balls on a baking sheet until they are firm, then transfer them to a freezer bag or an airtight container. Roll them in sugar and bake them whenever a craving hits.
Freeze the baked cookies. Let the cookies cool completely first, then store them in an airtight container. Baked cookies keep in the freezer for up to 3 months.
More Halloween Dessert Ideas
If you are building a full dessert spread, these spider cookies pair well with other easy Halloween sweets. Ghost cupcakes and frosted Halloween sugar cookies both fit the same playful theme, and spider Rice Krispie treats are another no fuss option that kids can help assemble.
What type of peanut butter is recommended for peanut butter spider cookies?
For the best texture, use a processed creamy peanut butter, not a natural style. Natural peanut butter can cause the cookies to spread too much and become greasy. The recipe specifically calls for creamy peanut butter that contains stabilizers for consistent results.
How long should you bake peanut butter spider cookies and at what temperature?
Bake the cookies at 350°F for 8 to 11 minutes, until the edges begin to crack and turn golden. It is better to slightly underbake them, as they will continue to set on the hot baking sheet after removal. The baking time ensures a soft and chewy texture.
How do you decorate peanut butter spider cookies with chocolate legs and candy eyes?
After baking and cooling the cookies, pipe melted semi-sweet chocolate chips (with a little neutral oil) into four legs on each side of the peanut butter cup using a squeeze bottle or bag. Use a small dab of the melted chocolate to attach the candy eyeballs to the peanut butter cup. Allow the chocolate to set before moving the cookies.
Can you make peanut butter spider cookies ahead of time and freeze them?
Yes, you can freeze both the unbaked dough balls and the fully decorated cookies. For unbaked dough, shape the balls and freeze them on a baking sheet before transferring to a freezer bag. Baked cookies can be frozen in an airtight container for up to three months. Thaw at room temperature before serving.
Peanut Butter Spider Cookies These Halloween treats are soft, chewy peanut butter cookies with a mini Reese’s peanut butter cup pressed into the center, then dressed up with melted chocolate legs and candy eyeballs. If you have ever made peanut butter blossoms, the idea will feel familiar.
Total Time:26 min
Yield:24 cookies 1x
Ingredients
Scale
1/2 cup unsalted butter, 1 stick, room temperature 1/2 cup brown sugar 1/3 cup granulated sugar 3/4 cup creamy peanut butter, not natural 1 large egg 1 tsp vanilla extract 1 1/2 cups all purpose flour 1 tsp baking soda 1/2 tsp baking powder 1/2 tsp salt granulated sugar, for rolling the cookies Mini Reese’s Peanut Butter Cups 1/2 cup semi-sweet chocolate chips, for melting 1/2 tsp neutral oil, for melting Candy eye balls
Instructions
1-Unwrap about 24 mini reese’s cups, place: Unwrap about 24 mini reese’s cups, place in a bowl and put in the freezer. This helps them to maintain their shape once added to the hot cookies. Preheat the oven to 350ºF. 2-In a mixing bowl, combine the butter,: In a mixing bowl, combine the butter, brown sugar, and sugar. Beat with an electric mixer for 1 minute, until smooth and fluffy. 3-Add in the peanut butter, egg, and: Add in the peanut butter, egg, and vanilla extract, beat again, less than 1 minute. 4-Add in the flour, baking soda, baking: Add in the flour, baking soda, baking powder and salt, mixing on low or with a spatula just until combined. Be careful not to over mix. 5-Use a small cookie scoop or tablespoon: Use a small cookie scoop or tablespoon to form tablespoon sized balls from the dough. Roll the dough between your hands to form a uniform ball, then roll in granulated sugar. Place the cookies 2-3 inches apart on a silicone lined baking sheet and bake for 8-11 minutes or until the edges of the cookies begin to crack and turn golden in color. 6-Remove the cookies from the oven and: Remove the cookies from the oven and press a mini reese’s cup into the center of each cookie. Allow the cookies to cool for 15-20 minutes before moving to cooling rack. Moving the cookies while they are still warm can cause the reese’s cup to sink, losing its shape. 7-Place the chocolate chips and oil if: Place the chocolate chips and oil if needed in a microwave safe bowl. Microwave for 3 minutes on 50% power, stirring after each minute. Continue to microwave until fully melted. Transfer the melted chocolate into a squeeze bottle or a sandwich bag with the corner cut off. Draw 4 legs on each side of the cookies. 8-Use a small amount of melted chocolate: Use a small amount of melted chocolate on the back of the candy eye balls to attach them to the reese’s cup. Allow the chocolate to set before moving the cookies to a serving platter.
Last Step:
Please leave a rating and comment letting us know how you liked this recipe! This helps our business to thrive and continue providing free, high-quality recipes for you.