Ingredients
– approximately a 7-ounce package (about 24 cookies) Ladyfingers
– 8 ounces mascarpone cheese, room temperature
– 1 1/2 cups heavy whipping cream, prepared
– 1/3 cup granulated sugar
– 1 teaspoon vanilla extract or imitation vanilla
– 1 1/2 cups espresso (or strong coffee, decaf as a substitute)
– 3 tablespoons coffee-flavored liqueur (optional)
– Cocoa powder for dusting on top
Instructions
1-First Step: Prepare the Cream Filling Start by beating the heavy whipping cream at medium speed in a large mixing bowl. Gradually add the granulated sugar and vanilla extract while continuing to beat. Continue whipping until stiff peaks form, which means the cream stands up straight when you lift the beaters. This usually takes about 3-5 minutes. Be careful not to overbeat, or the cream may separate. Once the cream is whipped, gently fold in the mascarpone cheese until combined. Use a rubber spatula and fold with a light hand to maintain the airiness of the whipped cream. Continue folding until you have a smooth, uniform filling with no visible streaks of mascarpone. This creates the rich and creamy layer that will go between the ladyfingers. Set this mixture aside while you prepare the coffee dip.
2-Second Step: Prepare the Coffee Mixture In a shallow bowl that’s wide enough to dip the ladyfingers, combine the espresso (or strong coffee) with the coffee-flavored liqueur if you’re using it. Stir gently to mix. If you’re making a non-alcoholic version, simply use the full amount of espresso or strong coffee. Make sure the coffee has cooled to room temperature before using, as hot liquid will make the ladyfingers too soft too quickly. The coffee mixture is what gives tiramisu its distinctive flavor, so don’t skip this step or substitute with instant coffee if you can help it. Freshly brewed espresso or very strong coffee provides the best results. If you’re sensitive to caffeine, decaf coffee works perfectly as a substitute without compromising the flavor.
3-Third Step: Dip and Arrange the First Layer of Ladyfingers Working quickly, dip each ladyfinger into the coffee mixture. The key here is to dip briefly on both sides without soaking. A quick dip of about 1-2 seconds per side is enough to absorb the flavor without becoming soggy. The ladyfingers should still feel firm to the touch after dipping. Arrange the dipped ladyfingers in a single layer in the bottom of an 8×8 inch square pan or a similar-sized dish. Break them as needed to fit the pan, but try to keep the layer as even as possible. This first layer will form the foundation of your tiramisu, so take care to place them snugly against each other without leaving large gaps.
4-Fourth Step: Add the First Cream Layer Spread half of the mascarpone mixture over the layer of ladyfingers. Use an offset spatula or the back of a spoon to create an even layer. Be gentle as you spread to avoid disturbing the ladyfingers underneath. The cream should completely cover the ladyfingers, creating a smooth surface for the next layer. This first cream layer is where the magic starts to happen. The moisture from the coffee-soaked ladyfingers will begin to soften slightly, melding with the creamy mascarpone mixture. This interaction is what creates the perfect tiramisu texture after chilling.
5-Fifth Step: Add the Second Layer of Ladyfingers Dip another batch of ladyfingers in the coffee mixture using the same quick-dip technique. Arrange them over the first cream layer, creating a second solid layer of ladyfingers. Try to place them in the opposite direction of the first layer for better stability, though this isn’t strictly necessary. Make sure this layer is as even as the first one. The ladyfingers should fit snugly together, creating a solid foundation for the final cream layer. If you have any broken pieces, use them to fill in gaps so the entire surface is covered.
6-Sixth Step: Add the Final Cream Layer Spread the remaining mascarpone mixture over the second layer of ladyfingers. Again, use an offset spatula or the back of a spoon to create a smooth, even layer. This is the top of your tiramisu, so take extra care to make it as neat and attractive as possible. You can create decorative swirls or patterns in the cream with your spatula if you like, or simply smooth it flat. The cream layer should be thick enough to completely cover the ladyfingers underneath. At this point, your tiramisu is fully assembled and ready for the final touch.
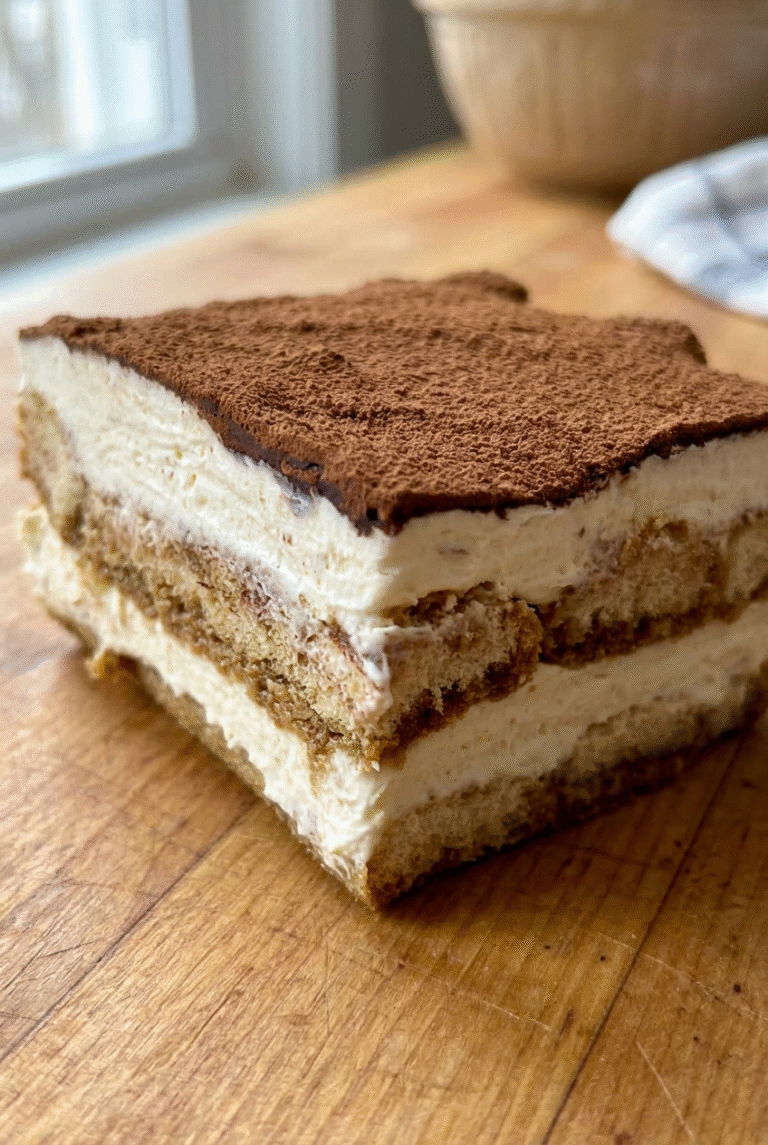
7-Final Step: Dust with Cocoa and Chill Dust the top generously with cocoa powder using a fine mesh strainer. This creates a beautiful, professional-looking finish and adds the classic bitter chocolate flavor that balances the sweet cream. Hold the strainer about 6 inches above the tiramisu and tap gently to distribute the cocoa evenly. Cover the dish with plastic wrap and refrigerate for at least 3 to 4 hours, or preferably overnight. This chilling time is crucial as it allows the flavors to meld together and the ladyfingers to soften to the perfect texture. The tiramisu will keep well in the refrigerator for 2 to 3 days, making it an excellent make-ahead dessert for entertaining.
Last Step:
Please leave a rating and comment letting us know how you liked this recipe! This helps our business to thrive and continue providing free, high-quality recipes for you.Notes
🚫 Quick dip ladyfingers only – avoid soaking to prevent sogginess!
🍸 Skip liqueur for an alcohol-free version without losing flavor.
⏰ Make ahead and chill overnight for the best taste and texture.
- Prep Time: 20 minutes
- Chill Time: 4 hours
- Cook Time: 0 minutes
- Category: Dessert
- Method: No Bake
- Cuisine: Italian
- Diet: Vegetarian
Nutrition
- Serving Size: 1 slice
- Calories: 297 kcal
- Sugar: 11g
- Sodium: 77mg
- Fat: 18g
- Saturated Fat: 11g
- Unsaturated Fat: 7g
- Trans Fat: 0g
- Carbohydrates: 26g
- Fiber: 1g
- Protein: 5g
- Cholesterol: 88mg