Ingredients
– 12 ounces fresh cranberries
– 1 cup granulated sugar (for syrup)
– 1/2 cup water
– 1 cup granulated sugar (for coating)
Instructions
1-First Step: Preparation and Cleaning Start by picking through your bag of fresh cranberries. You want to remove any berries that are soft, shriveled, or mushy. Only the firm, plump berries will hold their shape and look good once sugared. Rinse the chosen berries in a colander under cold water to remove any debris or residue. After rinsing, it is crucial to dry them thoroughly. Lay them out on a clean kitchen towel or paper towels and pat them dry. If the berries are wet when they hit the syrup, the coating will not stick properly, and they may become sticky rather than crisp.
2-Second Step: Making the Simple Syrup In a medium saucepan, combine one cup of granulated sugar and one-half cup of water. Place the saucepan over medium heat. Stir gently until the sugar completely dissolves. You do not need to boil the mixture for a long time; just heat it enough to clear the granules. Once the liquid is clear, remove it from the heat and let it cool. It is very important that the syrup is cool to the touch before the next step. If you add hot syrup to the berries, you might partially cook them, making them soft and losing their distinct pop.
3-Third Step: Coating the Berries Pour your cooled syrup into a mixing bowl. Add the cleaned and dried cranberries to the bowl. Gently toss the berries with a spoon or spatula to ensure every single one is coated in the sticky liquid. Let them sit in the syrup for about five minutes. This resting period allows the syrup to adhere to the skin of the fruit. Stir them occasionally to keep the coating even. You will notice the berries looking glossy and wet, which is exactly what you want.
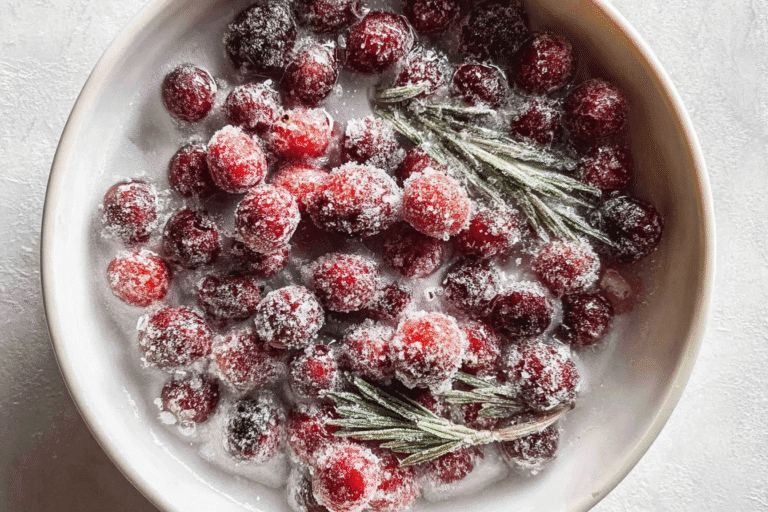
4-Fourth Step: The Sugar Toss While the berries are sitting in the syrup, prepare your coating station. Pour the remaining cup of granulated sugar into a wide, shallow bowl or baking dish. Using a slotted spoon or a fork, lift the berries out of the syrup. Let the excess liquid drip off for a moment so they are not dripping wet. Drop the berries, a few at a time, into the bowl of dry sugar. Roll them around or shake the bowl gently to coat them completely. The sugar should stick to the syrup layer, creating a frosted, sparkling look. Place the coated berries on a wire rack set over a baking sheet to catch any falling sugar. Make sure they are in a single layer and not touching each other too much.
5-Final Step: Drying and Setting This step requires patience. Allow the cranberries to sit on the wire rack at room temperature until they are dry to the touch. This usually takes about one to two hours, depending on the humidity in your kitchen. Do not rush this by putting them in the oven unless you are certain the heat is very low, as heat can melt the sugar coating. Once they are dry, they will feel firm and crunchy. They are now ready to use as a garnish or to store for later. For more detailed instructions and visual aids, you might want to check a classic sugared cranberries recipe to see the final texture you are aiming for.
Last Step:
Please leave a rating and comment letting us know how you liked this recipe! This helps our business to thrive and continue providing free, high-quality recipes for you.Notes
🫐 Use fresh, firm cranberries—avoid soft or frozen for best results.
💧 Handle gently after syrup to prevent bursting.
❄️ Re-roll in sugar if coating softens after storage.
- Prep Time: 10 minutes
- Drying Time: 2 hours
- Cook Time: 5 minutes
- Category: Desserts
- Method: No Bake
- Cuisine: American
- Diet: Vegetarian
Nutrition
- Serving Size: 1/4 cup
- Calories: 110 kcal
- Sugar: 27g
- Sodium: 2mg
- Fat: 0g
- Saturated Fat: 0g
- Unsaturated Fat: 0g
- Trans Fat: 0g
- Carbohydrates: 28g
- Fiber: 2g
- Protein: 0g
- Cholesterol: 0mg