Ingredients
– 1 (6-ounce) package strawberry gelatin for bright berry flavor and classic jello texture
– 2 cups boiling water for dissolving the gelatin powder
– 1 cup ice cold water for cooling the gelatin quickly
– 1 (15-ounce) can jellied cranberry sauce for sweet-tart flavor
– 1 cup sour cream for smooth, creamy texture
– Whipped cream for serving, optional
Instructions
1-First Step: Dissolve the gelatin Start by setting out a large mixing bowl. Pour in the 6-ounce package of strawberry gelatin, then add 2 cups boiling water. Whisk well until the powder is completely dissolved. This part matters because any undissolved granules can leave the mold uneven or grainy. Once the gelatin is smooth, whisk in 1 cup ice cold water. The cold water lowers the temperature fast and helps the mixture begin cooling right away. If you are making this on a warm day, use very cold water straight from the fridge or even water with a few ice cubes added, then measured carefully.
2-Second Step: Cool the gelatin mixture Place the bowl in the refrigerator for about 15 minutes so the gelatin can cool down. You do not want it to set fully at this stage, but it should be cooler before the creamy mixture goes in. This keeps the sour cream from curdling and helps the final texture stay silky. If you are in a hurry, do not skip this step. A warm gelatin base can make the mold look separated instead of smooth. If you are using a dietary swap like dairy-free yogurt, this cooling step still matters because it helps the mixture stay balanced.
3-Third Step: Mix the cranberry sauce and sour cream In a medium bowl, whisk together the 15-ounce can jellied cranberry sauce and 1 cup sour cream until smooth. You want the mixture creamy and well blended, with no large lumps of cranberry sauce left behind. This is where the recipe gets its signature sweet-tart flavor and soft pink color. For the best texture, make sure the sour cream is not icy cold from the fridge. Letting it sit out for a few minutes can make whisking easier. Full fat sour cream gives the richest flavor, but light sour cream works well if you want a slightly lighter dessert.
4-Fourth Step: Combine everything gently Take the cooled gelatin out of the refrigerator and add the cranberry-sour cream mixture. Stir until everything is evenly blended. Work slowly so the mixture stays smooth and airy instead of splashing around the bowl. At this point, the color should look evenly pink with a creamy finish. If you want a little more fruit flavor, this same method also works with raspberry gelatin or cranberry gelatin. The process stays the same, so once you learn the basic Strawberry Jello Mold method, you can easily change up the flavor for different events.
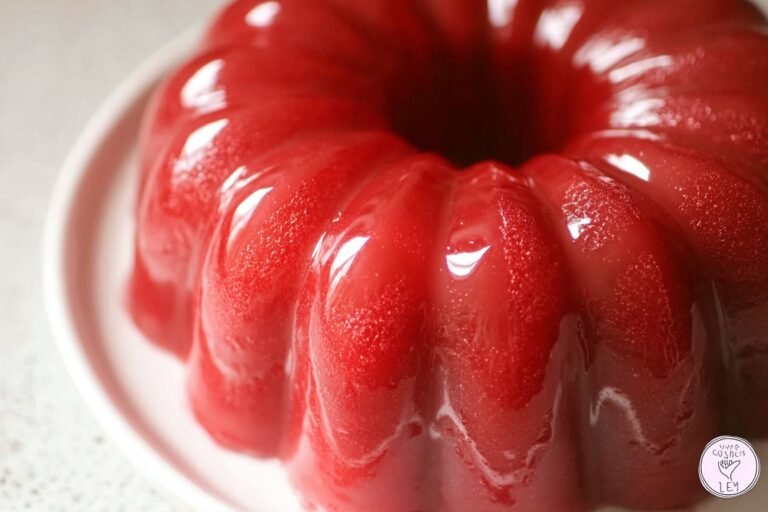
5-Fifth Step: Prepare the mold Lightly coat a nonstick gelatin mold with cooking spray. This helps the molded salad release cleanly after chilling. If you do not have a gelatin mold, a bundt pan with nonstick spray works well too. You can also use a 9×13-inch pan and serve the dessert directly from the dish if you prefer a simpler presentation. Pour the mixture into the prepared mold. Tap the pan gently on the counter once or twice to release any air bubbles. This can help the finished salad look smoother when unmolded.
6-Sixth Step: Chill until fully set Refrigerate the mold for at least 6 hours, though overnight is even better. The longer chill time gives the gelatin a firmer structure, which makes it easier to unmold and slice. If you are serving it for a brunch or dinner party, make it the day before so you are not rushing at the end. Place the mold on a level shelf in the refrigerator so it sets evenly. Try not to move it around too much while it chills, since that can affect the shape.
7-Final Step: Unmold and serve To release the set gelatin, loosen the edges carefully and invert the mold onto a serving plate. If needed, dip the outside of the mold in warm water for just a few seconds to help it loosen, but do not leave it in too long or the mold may melt. This is one of the most common mistakes with molded gelatin desserts. Once unmolded, slice and serve with whipped cream if you like. The whipped topping is optional, but it adds a nice finishing touch. If you are serving a crowd, you can also plate each slice with a few fresh berries on the side.
Last Step:
Please leave a rating and comment letting us know how you liked this recipe! This helps our business to thrive and continue providing free, high-quality recipes for you.Notes
🔥 Use boiling water to fully dissolve gelatin powder.
❄️ Let gelatin cool before mixing in sour cream to prevent melting.
🍲 Bundt pan or 9×13 dish works if no mold; spray nonstick.
- Prep Time: 10 minutes
- Chill Time: 8 hours
- Category: Desserts
- Method: Chilling
- Cuisine: American
- Diet: Vegetarian
Nutrition
- Serving Size: 1 slice
- Calories: 173 kcal
- Sugar: 31g
- Sodium: 109mg
- Fat: 4g
- Saturated Fat: 2g
- Unsaturated Fat: 2g
- Trans Fat: 0g
- Carbohydrates: 32g
- Fiber: 0g
- Protein: 1g
- Cholesterol: 11mg