Ingredients
Instructions
1-First Step: Preparation Begin by lining a standard muffin tin with 12 paper liners. This will ensure your cups release easily and maintain their shape. If you prefer deeper cups, you can use a larger muffin tin and adjust the recipe accordingly. Measure all your ingredients beforehand, as this recipe moves quickly once you start melting the chocolate. For the oats, you can either leave them whole for texture or pulse them in a food processor briefly for a smoother filling.
2-Second Step: Creating the Chocolate Layer In a microwave-safe bowl, combine 2 cups of semi-sweet chocolate chips with 2 tablespoons of coconut oil. The coconut oil helps the chocolate melt smoothly and sets up firmly when chilled. Microwave in 30-second bursts, stirring between each interval. This prevents the chocolate from scorching and ensures an even consistency. Continue until the mixture is completely smooth and glossy. This process usually takes about 1-2 minutes total.
3-Third Step: Forming the Base Spoon approximately 1 tablespoon of the melted chocolate mixture into each paper liner. Use the back of the spoon to spread the chocolate up the sides of the liner, creating a cup shape. The sides should be about 1/4 inch high to hold the filling properly. Once all cups are formed, place the muffin tin in the freezer for about 10 minutes. This quick chilling sets the chocolate so it holds its shape when you add the filling.
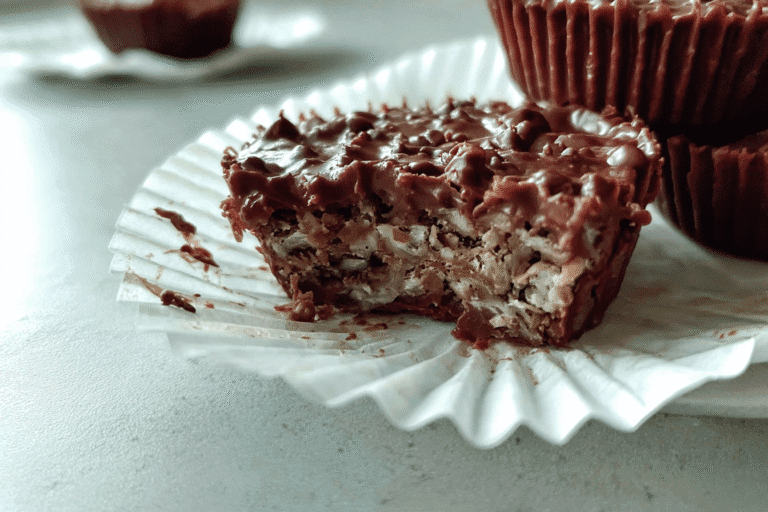
4-Fourth Step: Preparing the Filling While the chocolate base chills, prepare the peanut butter oatmeal filling. In a medium bowl, combine 1 cup creamy peanut butter, 1/4 cup powdered sugar, 1/4 cup softened unsalted butter, 1 cup old-fashioned oats, 1 teaspoon vanilla extract, and 1/4 teaspoon salt. Beat these ingredients together until well combined and smooth. The oats add texture and make these cups more filling than traditional peanut butter cups.
5-Fifth Step: Filling the Cups Remove the muffin tin from the freezer. Using a teaspoon or small cookie scoop, place about 1 teaspoon of the peanut butter oatmeal filling into each chocolate cup. Gently press down to create an even layer, but avoid pressing too hard which might crack the chocolate shell. If you have extra filling, you can enjoy it as a snack or use it to make additional cups if you have extra chocolate and liners.
6-Sixth Step: Adding the Top Layer If you have remaining melted chocolate, spoon about 1 tablespoon over the filling in each cup. Spread gently to completely cover the peanut butter mixture. If your chocolate has hardened too much, reheat it in the microwave for 15-20 seconds. If you don’t have enough chocolate left, you can melt additional chips with a small amount of coconut oil (1/2 teaspoon per 1/2 cup chips) to finish the tops.
7-Final Step: Chilling and Serving Place the completed cups in the refrigerator for at least 30 minutes to fully set. For firmer results, leave them in the fridge for 1 hour. Once set, these no bake chocolate cups can be stored in an airtight container in the refrigerator for up to 2 weeks or frozen for up to 3 months. For the best eating experience, let them sit at room temperature for 5 minutes before serving to soften slightly. The contrast between the cold chocolate and the creamy filling is absolutely delightful.
Last Step:
Please leave a rating and comment letting us know how you liked this recipe! This helps our business to thrive and continue providing free, high-quality recipes for you.Notes
🥄 Press mixture very firmly into cups to prevent crumbling when eating.
❄️ For firmer set, freeze for 20 minutes after chilling.
🌰 Swap peanut butter for almond or sunflower for nut-free version.
- Prep Time: 10 minutes
- Chill Time: 1 hour
- Cook Time: 0 minutes
- Category: Desserts
- Method: No Bake
- Cuisine: American
- Diet: Vegetarian
Nutrition
- Serving Size: 1 cup
- Calories: 220 kcal
- Sugar: 14g
- Sodium: 100mg
- Fat: 12g
- Saturated Fat: 4g
- Unsaturated Fat: 7g
- Trans Fat: 0g
- Carbohydrates: 25g
- Fiber: 3g
- Protein: 6g
- Cholesterol: 0mg