Ingredients
– 1 tablespoon coconut oil or any neutral-flavored oil This acts as a base to help bind the ingredients and adds a subtle richness that enhances the overall texture
– 1 cup natural peanut butter (preferably made from 100% peanuts, with no stabilizers) Serves as the creamy core, providing protein and a nutty flavor that holds the bars together while offering a satisfying bite
– 1/4 cup honey (maple syrup can be used as a substitute for a vegan version) Sweetens the mixture naturally; honey adds a floral note, while maple syrup keeps it plant-based for those avoiding animal products
– 2 tablespoons white miso paste (optional but recommended for umami flavor) Infuses a savory depth that balances the sweetness, making the bars stand out with its fermented goodness; this is great for boosting flavor without extra salt
– 1 teaspoon vanilla extract Adds a warm, aromatic touch that rounds out the flavors and makes the bars more inviting for everyday snacking
– 5 cups (5 ounces) cornflakes (gluten-free and/or vegan variety if needed) Provides the signature crunch; opt for gluten-free versions to accommodate dietary restrictions, ensuring everyone can enjoy the texture
– 1 1/2 cups (9 ounces) semisweet chocolate chips or dark chocolate bars Melts into a smooth topping that delivers a rich, chocolatey finish; choose dark varieties for a healthier option with less sugar
– Flaky sea salt (such as smoked flaky sea salt) for topping Finishes the bars with a hint of saltiness that enhances the flavors and adds a professional touch to your homemade treats
Instructions
First Step: Prepare Your Mise en Place First, gather all your ingredients and tools to make the process effortless. Measure out 1 tablespoon of coconut oil, 1 cup of natural peanut butter, and the rest as listed. For a vegan twist, swap honey with maple syrup right from the start. This step helps busy parents and working professionals stay organized and avoid any mid-recipe scrambles.
Second Step: Mix the Base Ingredients Second, in a large bowl, combine the peanut butter, honey (or maple syrup), miso paste, and vanilla extract. Stir until smooth, adjusting for taste as needed this is where the umami from miso shines in your miso chocolate peanut butter cornflake bars. If you’re making a gluten-free version, double-check your cornflakes now. This mixture forms the heart of the bars, binding everything together for a cohesive treat.
Third Step: Add the Cornflakes Third, gently fold in the 5 cups of cornflakes to the mixture, taking care not to crush them too much for that perfect crunch. This is a great spot to incorporate dietary preferences, like using vegan cornflakes if required. For baking enthusiasts, toasting the cornflakes lightly in a pan can enhance the texture, making your miso chocolate peanut butter cornflake bars even more irresistible.
Fourth Step: Press into a Pan Fourth, press the combined mixture firmly into a lined baking pan to create an even layer. Use the back of a spoon or your hands for this, ensuring it’s packed tightly to prevent crumbling later. If you’re adapting for seniors or those with mobility concerns, this step can be made easier with a spatula. Pressing well is key for miso chocolate peanut butter cornflake bars that hold their shape.
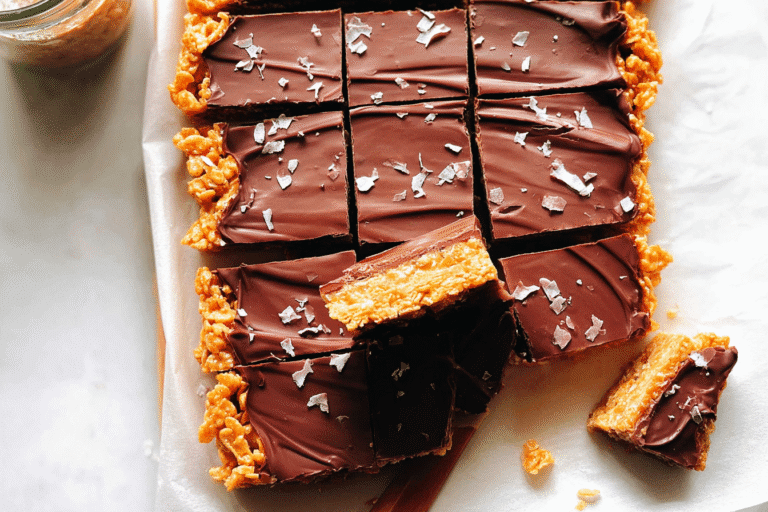
Fifth Step: Prepare and Add the Chocolate Topping Fifth, melt the 1 1/2 cups of semisweet chocolate chips in a microwave or double boiler, stirring until smooth. For the best results, heat in short bursts to avoid burning, especially if opting for dark chocolate bars. Once melted, pour it evenly over the cornflake layer, then sprinkle with flaky sea salt for that finishing touch. This step allows for variations, like using carob for a low-sugar option, fitting diet-conscious needs.
Sixth Step: Chill and Set Sixth, place the pan in the refrigerator for at least two hours to let everything set firmly. This cooling time is crucial for the bars to achieve the right texture, and it’s a good moment to consider make-ahead strategies for families. Once set, slice into bars for serving, which makes them portable for students or travelers on the go. Your miso chocolate peanut butter cornflake bars are now ready to enjoy!
Final Step: Finishing Touches and Serving Finally, once chilled, remove the bars from the pan and cut them into even pieces for easy sharing. Serve them as a dessert or snack, and for an extra flair, pair with cherry almond bars for a dessert spread. These miso chocolate peanut butter cornflake bars store well and can be enjoyed over several days, making them a versatile choice for any occasion. Remember to link external resources like no-bake chocolate oat bars for more inspiration.
Last Step:
Please leave a rating and comment letting us know how you liked this recipe! This helps our business to thrive and continue providing free, high-quality recipes for you.Notes
🌟 Use good quality natural peanut butter without stabilizers for the best texture.
🌾 Choose gluten-free and vegan cornflakes if dietary restrictions apply.
❄️ Ensure chocolate is fully set in the fridge before cutting to keep bars intact.
- Prep Time: 15 minutes
- Chilling time: 2 hours
- Cook Time: 5 minutes
- Category: Snack
- Method: No-bake assembly and chilling
- Cuisine: Fusion
- Diet: Vegan option available
Nutrition
- Serving Size: 1 bar