
Introduction to Homemade Marble Cake
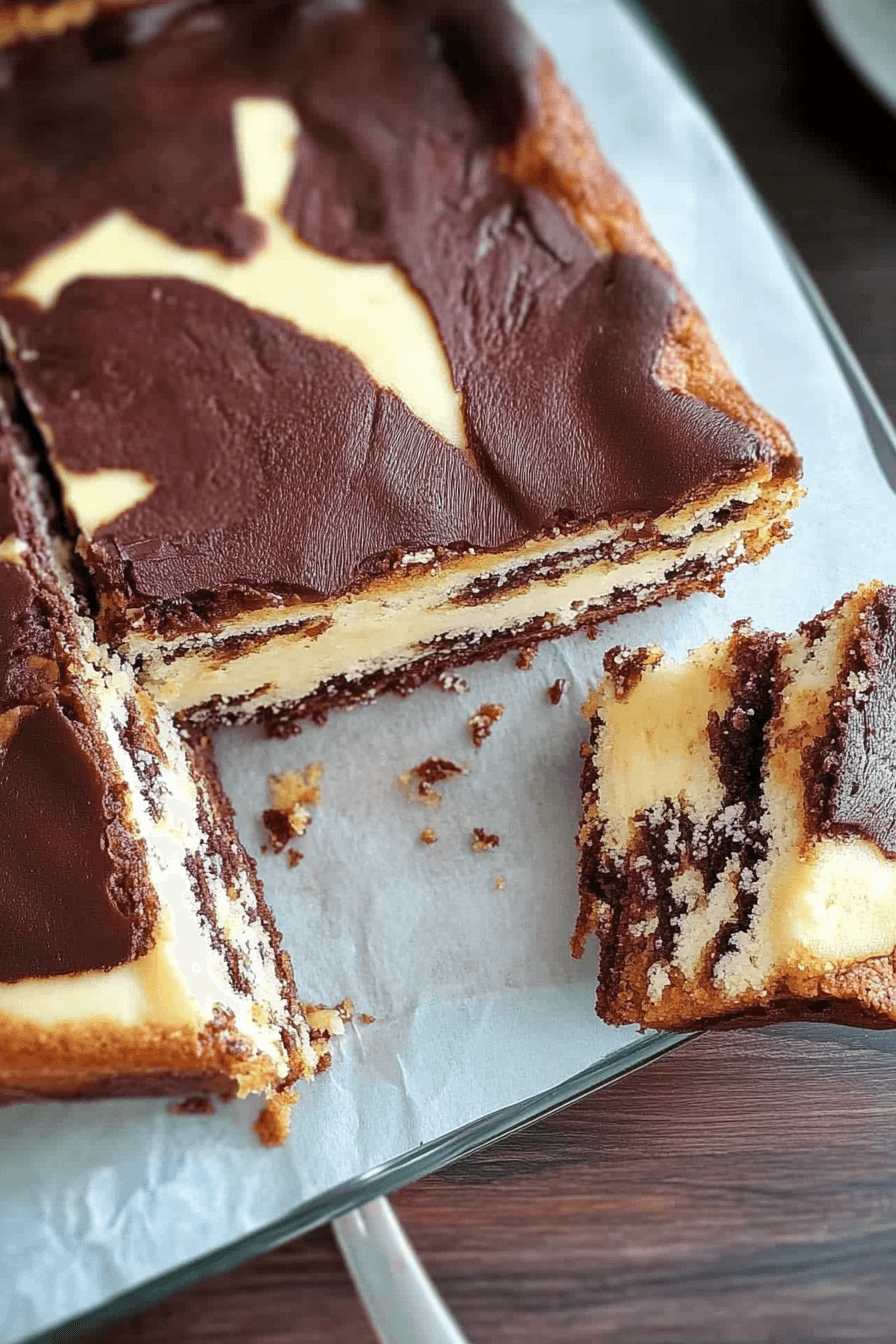
Homemade marble cake is a classic dessert that effortlessly combines the rich flavors of vanilla and chocolate in a beautifully swirled pattern. This delightful treat is perfect for any occasion, whether it’s a family gathering, a casual get-together, or simply a moment to indulge. As you whip up this cake from scratch, you’ll appreciate the joy of baking a dessert loved by many. With straightforward steps and delicious results, homemade marble cake becomes a go-to choice for everyone, from busy parents to aspiring chefs. Dive into the world of baking with this timeless recipe.
Benefits and Advantages of Homemade Marble Cake
Crafting a homemade marble cake offers numerous benefits beyond its delightful taste. Firstly, its simplicity allows even novice bakers to achieve professional results, making it a fantastic entry point for those new to baking. Moreover, the ingredients are typically pantry staples, ensuring quick and feasible preparation. Health-conscious individuals can also customize the recipe easily, adjusting sugar or substituting flour to suit dietary needs. Additionally, homemade versions are free from preservatives and artificial additives, ensuring a fresher and more natural option compared to store-bought alternatives. Explore the joy of baking with this versatile and accessible cake.
Ingredients Overview
Essential Ingredients for Homemade Marble Cake
- Cake Flour – 2 cups; provides a fine texture and tenderness to the cake.
- Unsalted Butter – 1 cup, softened; adds richness and keeps the cake moist.
- Sugar – 1 1/2 cups; sweetens the cake and aids in creating a tender crumb.
- Large Eggs – 4; binds the ingredients and adds structure.
- Buttermilk – 1 cup; ensures a moist texture and adds a subtle tang.
- Vanilla Extract – 2 teaspoons; enhances the flavor of both the vanilla and chocolate batters.
- Melted Chocolate or Cocoa Powder – 1/2 cup; used to create the chocolate swirl.
- Baking Powder – 2 teaspoons; helps the cake rise and achieve a light texture.
- Baking Soda – 1/2 teaspoon; works with the buttermilk to leaven the cake.
- Salt – 1/4 teaspoon; balances the sweetness and enhances flavors.
- Vegetable Oil – 2 tablespoons; contributes to a moist and tender crumb.
For those seeking vegan alternatives, replace eggs with flaxseed eggs and use vegan butter and milk. Gluten-free enthusiasts can use a gluten-free flour blend. If you’re aiming for a healthier option, substitute some sugar with coconut sugar.
Dietary Substitutions to Customize Your Homemade Marble Cake
For Vegan Friendly:
- Replace eggs with 1/4 cup of unsweetened applesauce per egg or 1 tablespoon of flaxseed meal mixed with 3 tablespoons of water per egg.
- Substitute butter with 1 cup of vegan butter or coconut oil.
- Use almond milk or any other dairy-free milk instead of buttermilk.
Gluten-Free Adjustments:
- Swap cake flour with 2 cups of gluten-free all-purpose flour blend.
- Ensure that all other ingredients like chocolate are certified gluten-free.
Healthier Options:
- Replace 1/2 cup of sugar with coconut sugar or a sugar substitute like stevia, adjusting for taste.
- Use Greek yogurt instead of buttermilk for a protein boost.
These substitutions ensure that irrespective of dietary preferences or restrictions, you can enjoy a delicious, homemade marble cake that suits your needs.
How to Prepare the Perfect Homemade Marble Cake: Step-by-Step Guide
Creating a delightful homemade marble cake requires a sequence of simple steps. Follow this guide to achieve a moist and beautifully marbled cake:
- First Step: Preheat your oven to 350°F (175°C). Grease and flour your chosen baking pan, whether it’s a bundt, loaf, or round pan.
- Second Step: In a large bowl, cream together 1 cup of softened butter and 1 1/2 cups of sugar until light and fluffy, approximately 3-5 minutes. This step is essential for incorporating air and ensuring a soft cake texture.
- Third Step: Add the 4 large eggs, one at a time, mixing well after each addition. Stir in the 2 teaspoons of vanilla extract for enhanced flavor.
- Fourth Step: Sift 2 cups of cake flour, 2 teaspoons of baking powder, and 1/2 teaspoon of baking soda in a separate bowl. Gradually add these dry ingredients to the wet mix, alternating with the 1 cup of buttermilk, starting and ending with flour. This method maintains the mix’s lightness.
- Fifth Step: Divide the batter into two bowls. To one bowl, incorporate the 1/2 cup of melted chocolate or cocoa powder and 1 tablespoon of vegetable oil, creating the chocolate mixture.
- Sixth Step: Alternate spoonfuls of vanilla and chocolate batters into the prepared pan. Use a knife to gently swirl the batters together, forming the signature marble effect. Be careful not to overmix as it could affect the marbled appearance and texture.
- Seventh Step: Place the pan in the preheated oven. Bake for 30-40 minutes, or until a toothpick inserted in the center comes out clean. This baking time ensures a moist and thoroughly cooked cake.
- Eighth Step: Once baked, remove the cake from the oven and allow it to cool in the pan for 10 minutes before transferring it to a wire rack to cool completely.
Enjoy your homemade marble cake with a drizzle of chocolate ganache or a simple dusting of powdered sugar. This cake can also be a delectable dessert choice for special occasions, making memorable moments around your table. For additional inspiration, take a look at our other delightful recipes.
These detailed steps guide even beginner bakers to a successful result, while offering expert tips for seasoned home cooks seeking to refine their cake-making skills. By paying close attention to each component and adjusting for individual preferences, everyone can perfect the art of making a homemade marble cake from scratch.
Mastering Homemade Marble Cake: Advanced Tips and Variations
Baking a homemade marble cake is not just about mixing chocolate and vanilla. For those who are eager to refine the basic recipe or add a personalized touch, there are a plethora of advanced tips and variations to consider. These suggestions will help you perfect your marbling technique and introduce new flavors to your classic cake.
Perfecting the Marbling Technique
Creating a visually stunning marble effect involves skillfully swirling the batter. To achieve this:
- Use a knife: After pouring the batter into the pan, insert a knife and create gentle loops through the batter using an ‘S’ or ‘8’ motion. This process gently intertwines the vanilla and chocolate without overmixing.
- Avoid overmixing: Be careful not to overdo it. Too much mixing can blend the colors excessively, losing the distinct marbled appearance.
Flavor Variations and Enhancements
Experimenting with flavors can bring an exciting twist to your marble cake:
- Almond Extract: Adding a teaspoon of almond extract to the batter introduces a subtle nutty flavor, enhancing the chocolate and vanilla combination.
- Coffee Infusion: Incorporate a shot of espresso into the chocolate batter. The coffee accentuates the chocolate flavor, providing a rich and aromatic depth to the cake.
Innovative Cake Presentation
For those special occasions, consider alternative presentation methods:
- Bundt Pan: Using a bundt pan not only adds an elegant shape to your cake but also increases the surface area of the marbled effect, showcasing the intricate swirls beautifully.
- Ganache Topping: Once the cake cools, drizzling it with a rich chocolate ganache further enhances the look and taste, making it a dessert centerpiece.
For those eager to broaden their culinary repertoire, trying out these advanced tips can make the baking process more engaging and rewarding. Remember, the key to success lies in gentle handling and creative experimentation, turning your homemade marble cake from a simple treat to a gourmet dessert.
How to Store Homemade Marble Cake: Best Practices
Once you’ve baked a delicious homemade marble cake, proper storage ensures that every slice remains as moist and delicious as the first. By following these best practices, you can enjoy your cake over several days without compromising its quality.
Refrigeration and Room Temperature Storage
Depending on your consumption schedule and preferences, your marble cake can be stored in various ways:
- Room Temperature: If you plan to consume the cake within 2-3 days, storing it at room temperature in a sealed container will keep it fresh. Ensure the container is airtight to prevent the cake from drying out.
- Refrigeration: For those looking to keep their cake longer, refrigeration is ideal. Place your cake in an airtight container or wrap it in plastic wrap and store it in the refrigerator for up to 5 days. This method is particularly useful for cakes with cream-based toppings, which require cooler temperatures.
Freezing for Extended Storage
If you wish to preserve your cake for a longer period, freezing is an excellent option:
- Pre-freezing Individual Slices: Before freezing, cut the cake into individual slices. Wrap each slice in plastic wrap, ensuring they’re tightly sealed, and then place them in a freezer-safe bag or container. This strategy allows you to thaw only the slices you intend to eat, minimizing waste.
- Thawing Frozen Cake: When you’re ready to enjoy your frozen cake, allow the slices to thaw at room temperature for a few hours. For a faster option, you can microwave the slices for a few seconds, but be careful not to overheat them as this can dry them out.
By understanding how to store your homemade marble cake correctly, you preserve its moistness and flavor, ensuring that each bite is as delectable as the last. Whether you prefer quick consumption or long-term storage, these tips will help you savor every crumb.
Nutritional Value of Homemade Marble Cake
Understanding the nutritional content of a homemade marble cake can not only enhance your culinary experience but also help you make informed dietary choices. A traditional slice of homemade marble cake, typically weighing around 70 grams, provides a delectable mix of flavor and nutrients.
Calories: One of the factors to consider is that each slice contains approximately 200-250 calories, depending on the specific ingredients and serving size. This makes it a modestly indulgent treat, suitable for enjoying without overindulging.
Carbohydrates: Carbohydrates make up a significant portion of the cake, with approximately 30-35 grams per slice. These carbs primarily come from the sugar and flour used in the recipe, contributing to the cake’s structure and sweet flavor.
Fats: Marble cake typically contains about 10-12 grams of total fat per serving. The fat content is a blend of saturated and unsaturated fats, originating from the butter and any added oils, providing a moist texture.
Proteins: From the eggs and milk components, a slice delivers around 3-5 grams of protein, which contributes to its texture and nutritional balance.
Vitamins and Minerals: While not highly rich in vitamins and minerals, marble cake offers minimal amounts of calcium, iron, and other micros contributed by the recipe’s diverse ingredients. For example, opting for cocoa powder in the chocolate batter enhances the iron content.
Customizing for Diet Preferences: By using gluten-free flour and plant-based milk alternatives, you can reduce the cake’s allergenic potential while maintaining nutritional value. Additionally, substituting some sugar with sweeteners like stevia can help lower the carbohydrate content for those managing their sugar intake.
Balancing indulgence with health considerations in your homemade marble cake invites creative ingredient usage. For a more detailed recipe with nutritional emphasis, feel free to explore our banana pudding cheesecake.
FAQs: Frequently Asked Questions About Homemade Marble Cake
What is the secret to achieving a moist and fluffy texture in homemade marble cake?
Avoid overmixing the batter to retain air in the mixture. Use fresh ingredients, particularly baking powder and baking soda, as leavening stability is crucial. Incorporating buttermilk adds moisture, producing a tender and fluffy cake.
How do I create the marbled effect in my cake?
To achieve the marbled effect, alternate dollops of vanilla and chocolate batter in your chosen baking pan. Use a knife or skewer to gently swirl the two batters together, creating a unique marbled pattern without overmixing. Each swirl should focus on visual appeal while maintaining distinct batter sections.
Can I use all-purpose flour instead of cake flour for making marble cake?
Yes, you can substitute all-purpose flour for cake flour, though it may result in a denser texture. To mimic cake flour, remove two tablespoons of all-purpose flour per cup and replace it with cornstarch. These adjustments help achieve a similar lightness while keeping the cake accessible.
How do I prevent the chocolate batter from sinking to the bottom of the pan during baking?
The key is balancing the weight and consistency of both batter portions. Ensure the chocolate batter is not too thin by properly melting and cooling your chocolate if adding directly, or using balanced amounts of cocoa powder and liquid. Swift swirling combined with even batter layering also aids in preventing sinking.
For further exploration into delicious baked goods that also feature distinct textures and patterns, visit our recipe on pistachio cranberry bark, which offers unique variations for those interested in homemade treats.
Print
Homemade Marble Cake from Scratch
- Total Time: 55 minutes
Description
🍰 Indulge in the perfect balance of rich chocolate and buttery vanilla swirled into a soft, fluffy texture—pure homemade goodness in every bite! 🍫
🎂 Simple ingredients, easy steps, and a stunning marbled effect make this cake a must-try for any baking lover—because homemade always tastes better! 🍪
Ingredients
Cake flour
Unsalted butter
Vegetable oil
Granulated sugar
Eggs
Buttermilk
Baking powder
Baking soda
Vanilla extract
Salt
Melted chocolate or cocoa powder
Instructions
1. Preheat your oven to 350°F (175°C) and grease your chosen cake pan.
2. In a bowl, whisk together cake flour, baking powder, and baking soda.
3. In a separate large bowl, beat butter, oil, and sugar until light and fluffy.
4. Add eggs one at a time, mixing well after each addition.
5. Stir in buttermilk and vanilla extract to the wet ingredients.
6. Gradually add the dry ingredients to the wet ingredients, mixing until just combined.
7. Separate about 30% of the batter into another bowl.
8. Mix melted chocolate or cocoa powder into the smaller portion of batter to create the chocolate mixture.
9. Alternately spoon the vanilla and chocolate batters into the prepared pan.
10. Use a knife or skewer to gently swirl the batters together to create a marble effect, being careful not to overmix.
11. Bake in the oven for 30-40 minutes, or until a toothpick inserted in the center comes out clean.
12. Let the cake cool in the pan for about 10 minutes before transferring to a wire rack to cool completely.
13. If desired, top with chocolate frosting or ganache once the cake has cooled.
14. Serve and enjoy your homemade marble cake!
15. Store leftovers at room temperature for 2-3 days, in the refrigerator for up to 5 days, or freeze for up to 3 months.
Notes
Use about 70% vanilla batter and 30% chocolate batter to maintain the perfect flavor balance.
Swirl the batters gently with a knife to create a clean marbled effect without overmixing.
Store the cake at room temperature for up to 3 days or freeze it for longer freshness.
- Prep Time: 20
- Cook Time: 35
- Category: Dessert
- Method: Baking
- Cuisine: German